

Joe Licata’s Best-Ever Coconut Cream Pie
David Miller
Straight from the cook’s mouth:“Joe is my brother-in-law and a connoisseur of New Jersey diner desserts. He says that this is the best he’s ever had, and I believe him.” With a glowing endorsement like that, we think this Coconut Cream Pie is a “must-try.”For Crust:InstructionsThe Almond Crumb Crust goes great with this filling. Prepare and prebake the crust as directed. Set aside.For Filling:Ingredients1/2 cup sugar3-1/2 tablespoons cornstarch1/8 teaspoon salt2 cups whole milk3 large egg yolks2 tablespoons unsalted butter, cut into ½-inch pieces1 teaspoon vanilla extract1/2 teaspoon coconut extract1 cup sweetened flaked coconutInstructionsWhisk the sugar, cornstarch, and salt together in a medium-size heavy saucepan, preferably nonstick. Whisk in the milk and yolks. Place over medium heat and cook, whisking until the mixture thickens and starts to boil—about 5 to 7 minutes. Remove from the heat and whisk in the butter, one piece at a time. Whisk in the vanilla, coconut extract, and coconut.Pour the filling into the pie shell and smooth the top with a spoon. Place a piece of plastic wrap over the filling and smooth with your fingers to remove any air gaps. (The plastic keeps a “skin” from forming.) Transfer the pie to a rack and cool thoroughly. Refrigerate overnight.For Topping:Ingredients1/2 cup sweetened flaked coconut3/4 cup cold heavy cream or whipping cream3 tablespoons sifted confectioners’ sugar1/2 teaspoon vanilla extractInstructionsPut the coconut into a skillet over moderate heat and toast, stirring constantly, for 3 to 5 minutes, or until golden brown. Immediately transfer to a plate.About 10 minutes before you plan to serve the pie, chill a bowl and your electric mixer’s beaters for 5 minutes. Beat the cream until it holds soft peaks, then beat in the confectioners’ sugar. Add the vanilla and beat until the cream is stiff but not grainy.Spread the cream over the pie and sprinkle with toasted coconut.

Monstera
Michael Davis
Lush, tropical, and gorgeous, a massive, thriving Monstera in your home is a definite statement that you are a houseplant person. Learn all about growing theMonstera deliciosaand theM. adansonii, which is commonly called the ‘Swiss Cheese’ plant.About MonsteraIn North America, the Monstera plant is a houseplant. However, it is a tropical plant in theAraceaefamily, likePhilodendron,Anthurium,Epipremnum, andCaladium. In their native portions of southern Mexico and Central America, they are an evergreen vine that grows up tree trunks—up to 70 feet long—up to the rainforest canopy to find light. The most common variety in the home is Monstera deliciosa, which stays between 6 to 8 feet. This large leaf variety makes a wonderful floor plant. TheMonstera deliciosais sometimes called a split-leaf philodendron (though it is not actually a philodendron). The huge leathery leaves are as wide as 18 inches with natural perforations. The holes are meant to allow light to reach the other leaves below and also weather tropical storms.Monstera adds style indoors. Credit: N.Africa/ShutterstockTheMonstera adansonii, is also commonly called the ‘Swiss Cheese’ plant because it has small holes in the leaves (versus perforations). It has a smaller growth habit suitable for sitting on a shelf with trailing vines or in a hanging basket. The care is the same for both tropical plants.Monsteras grown indoors rarely flower or fruit. However, in their native climate, their fruit is sought after.Monstera deliciosaderives part of its name from those tasty fruits flavoring drinks and desserts. The green fruits look like a cob of corn and are said to taste like a banana-mango-pineapple combo.PlantingWhen to Plant MonsterasSince they are often grown as houseplants, monsteras can be potted up any time of the year. They need a home with an average temperature of 60° to 85°F and high humidity. These plants grow in the dappled, partial sun of the tropical forest canopy, so bright but indirect light is what they like. Place them near a sunny window but not in direct sunlight, which can cause leaf scorch. How to Plant MonsterasMonsteras are purchased as young plants, established older specimens, or from online vendors as cuttings. Young and established plants can be repotted if needed, like other houseplants. Cuttings should be rooted first. Choose a deep pot with ample room for growing roots and drainage holes. Although they are tropical plants, wet, soggy soil can still lead to root rot. Use a rich, fertile potting mix. If in doubt, add some perlite to aid with drainage.When transplanting or repotting, wetting the soil in the existing pot and letting it soak in for a few minutes can make removing the plant easier. Snip any girdling roots and gently loosen the root ball if it is pot bound.Take care to replant your monstera at the same height, with respect to the soil, as before. Don’t bury it or leave it perched too high. Tamp the fresh soil around the plant firmly to minimize air pockets.Sturdy support is necessary to prevent the stems from breaking. Support can be a tree trunk or a moss-covered pole for climbing.GrowingMonsteras are relatively easy houseplants to grow. Follow these care tips for lush foliage.Water this plant thoroughly, then allow the top quarter to one-third part to dry between waterings. As with many houseplants, misting leaves helps increase the humidity in dry interior settings. (If your monstera has a moss support pole, mist the moss, too.) Keep a mister bottle near your plant. Credit: DimaBerlinIf humidity is too low, the leaf edges will turn brown. To boost humidity, try setting the pot in a tray lined with pebbles and keep water in the tray. Small, local humidifiers are also available to increase the humidity if your home is especially dry.If you are overwatering or the growing medium is too moist, the leaves will “sweat.” If this happens, reduce watering to prevent root rot. Water less in winter. For potted monsteras, fertilize several times per year (from spring until fall) with a diluted liquid fertilizer according to the instructions on the label. Periodically wipe the leaves with a soft cloth to remove dust. Credit: DimaBerlinMonstera needs regular repotting as they grow to accommodate the root system. During the summer, you can move your monstera outdoors. Be careful to slowly acclimate the plants to higher light levels, or the plants will sunburn (just like we do!).Propagating your MonsteraMonsteras are simple to propagate and root well in water. Follow these steps to make more Monstera plants (and share them with your plant-loving friends!).Select a piece of stem with at least one node and leaf. If the node has a brown aerial root growing, it’s even better. Check this page from the University of Minnesota Extension to see a picture of what a monstera node looks like. Cut one inch below the node with sanitized, sharp shears. Rubbing alcohol does an excellent job of sterilizing pruners. Fill a clear-walled jar or vase with water and set the cutting inside. Keep the node submerged. Use bottled water if your tap water is heavily treated. Place the jar in a brightly lit and warm spot out of direct sunlight. Change the water weekly to keep it fresh. In 2 to 4 weeks, your cuttings should start to root. Transplant to moist potting mix once the baby roots are about an inch or two long. TypesMonstera deliciosais the classic houseplant of this group. With proper care, it can eventually reach your ceiling and display beautifully fenestrated glossy leaves 1 to 2 feet long. M. adansonii(“Swiss Cheese Plant”) is a slightly smaller plant with heart-shaped leaves and holes in the leaves. An agile climber if given support, water, and a little fertilizer.M. dubiahas smaller, variegated leaves and loves to climb, reaching about 3 feet.Any variegatedMonstera deliciosavariety! Unique and rare–and often expensive–variegated plants are suitable to be the centerpiece of your houseplant home. Cream and white colored bands and patches contrast starkly with the rest of the deep green leaves.Pests/DiseasesOverwatering is the most common cause of problems with monsteras, as with most houseplants. Monsteras don’t have many disease issues but can be bothered by common pests. AphidsScale insectsSpider mitesMealybugsWit and WisdomLearn to recognize monsteras and keep your eye out when shopping for groceries. Vendors often bring a truckload of houseplants to sell quickly at big grocery stores. They’ll be labeled with something non-descript like “green houseplant” or “tropical foliage plant.” Monstera deliciosa, especially, is often easy to find hiding in the mix and priced very affordably. Large monsteras are often on the discount rack because a couple of leaves were broken off or because no one wanted to carry them around. I scored a three-foot tall, established M. deliciosa for 20 bucks, and brought it home. It took off and now looks like a $200 plant.
Candytuft
Emily Miller
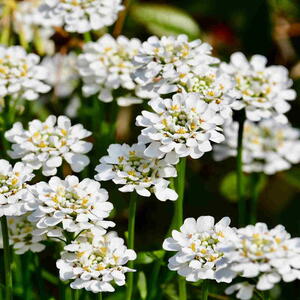
Sugar, spice, and everything nice—candytuft has it all. This evergreen, flowering groundcover (Iberis sempervirens) brightens gardens with its late-spring blooms, tolerates drought, attracts pollinators, and thrives in sunny, well-draining spots. Over the years, I’ve grown these charming plants in flower beds, rock gardens, and containers, and you’ll find all the top tips for growing and caring for candytuft below! About Candytuft PlantsIt may come as a surprise, but candytuft (Iberis sempervirens) actually belongs to the Brassica family and is related to broccoli, cabbage, and other brassicas. That said, this ornamental plant isn’t edible and can be toxic if ingested. But it has tons of uses in the garden—primarily as anevergreen flowering groundcover, but also in borders, rock gardens, mixed perennial beds, and containers.Pure spring bliss: candytuft spreads its tiny white blooms, blanketing the garden in delicate beauty. Credit: Catherine BoeckmannPrized for its low-growing, spreading habit, candytuft grows no taller than 12 to 18 inches and spreads 12 to 18 inches, forming dense mats of dark bluish-green foliage. From late spring to early summer, it delights with a profusion of tiny clustered blooms, usually white but sometimes in shades of purple, pink, and red. These candytuft flowers attract butterflies and other pollinators, while the plant’s foliage provides an attractive backdrop for annuals and perennials that bloom later in the season.A drought-tolerant perennial, candytuft prefers the lean, gravelly soils of its native Mediterranean. I often use it as a flowering groundcover around perennials that tolerate dry soil, like sedums, coneflowers, and veronica. It’s not suited for poorly draining gardens with heavy clay and isn’t recommended for humid regions, such as the southeastern United States. However, as a hardy plant in zones 3 to 9, it tolerates cold with ease.A snowy duo in full flower: candytuft carpets the ground beneath a white-blossomed tree,. Credit: Catherine BoeckmannPlantingCandytuft (Iberis sempervirens) grows best in full sun but can tolerate a touch of light afternoon shade in warmer regions. For soil, think Mediterranean—dry, gravelly, and well-draining. Avoid heavy clay or soggy spots, since poor drainage often leads to root rot. This perennial ground cover thrives in lean soil and doesn’t need much fertilizer to put on a beautiful spring show.When to Plant CandytuftCandytuft is typically planted in early spring, although some gardeners sow seeds outdoors in the fall before the ground freezes.Most people grow candytuft from pre-started plants bought at greenhouses, moving them outside only after the last frost date.You can also grow candytuft from seed. I personally start seeds indoors 6 to 8 weeks before your last spring frost. You can also sow seeds directly into the soil after frost danger has passed—if you don’t mind waiting a little longer for flowering to begin. How to Plant CandytuftTo sow candytuft seeds, prep your planting area by removing rocks, weeds, and debris, or fill seed starting trays or pots with seed-starting mix. Candytuft needs light to germinate, so cover the seeds with just a dusting of soil, then water them in. If you want a candytuft ground cover, space direct-sown seeds about 6 inches apart.For transplants,dig a hole slightly larger than the plant’s root ball and set the plant at the same depth it was growing in its nursery pot. Backfill, firm the soil around the base, and water well. If you’re planting multiples, space candytuft 12 to 18 inches apart so it can spread and form dense mats over time.GrowingThanks to its drought-tolerant nature, candytuft is well-suited for rock gardens and xeriscapes, but it can be grown in other places, too. When selecting plants for my moon garden, I included a few candytufts since the white or pastel flowers show up nicely after dark. These plants can be grown in containers too, but I don’t recommend it as they can look a little drab once they stop flowering.A cheerful spring garden, with candytuft adding its drift of white blooms to the seasonal display. Credit: MyvideoimageLightCandytuft grows and flowers best in full sun locations that get at least 6 to 8 hours of unfiltered light per day. In hot climates, candytuft can be grown in light afternoon shade as well.WaterNewly planted candytuft should be watered regularly to help the plants settle in, but watering should be reduced as the plants establish themselves. Once they’ve matured, candytuft usually won’t need any supplemental water except during periods of prolonged dry weather.FertilizerFertilizer is not required with candytuft. However, these plants will grow and flower better if you mix compost or a low nitrogen, slow-release fertilizer into the soil around their roots once a year in spring.HumidityAlthough cold weather is no problem for candytuft, these plants can develop powdery mildew during extended periods of highly humid weather. Spacing plants out properly and watering at the soil line can reduce mildew problems.Candytuft CareCandytuft doesn’t require pruning, but you may be able to trick your plants into producing a second flush of flowers by trimming the plants’ stems back by 1/3 after the first period of flowering ends. You can then leave the stems in place through winter and prune candytuft to 3 to 4 inches above the ground in early spring before the plant leafs out. This will cause candytuft to produce bushier growth and prevent legginess over time.Thanks to its hardy nature, candytuft generally doesn’t need winter protection in most areas. However, growers in zones 3 and 4 may want to apply a loose layer of mulch over candytuft roots in autumn to keep them cozy through winter.A springtime mosaic: Iberis sempervirens weaves bright white blooms among colorful flowers. Credit: Jolanta WojcickaPropagationCandytuft can root in any place its stems touch the ground, but it still spreads slowly and can take a while to fill in garden beds. If you’d like to generate new candytuft plants faster, root division is the way to go. Most of the candytuft plants you’ll find at nurseries are hybrids, and their seeds won’t grow “true to type” if you attempt to plant them.Every 3 to 5 years, dig up candytuft plants in autumn, about 4 to 6 weeks before frost is expected.Use your fingers, a shovel, pruners, or gardening forks to divide the root clump into 2 to 3 pieces. Each rooted section of the plant should have a few healthy stems in addition to a nice clump of roots.Plant the divided candytuft as soon as possible in your garden, and space multiple plants at least 12 inches apart.TypesMost candytuft plants have white flowers, but some cultivars bloom in pastel shades and may vary in height and bloom time. Here are just a few candytuft varieties for gardens that you may want to try, along with reasons why each stands out:‘Pink Ice’:This candytuft is just too cool with its pale pink flowers that often rebloom with deadheading.‘Little Gem’:A dwarf option for small spaces, this white-flowered candytuft only grows to about 6 inches in height.‘Alexandra’s White’:An early-blooming cultivar, ‘Alexandra’s White’ produces white blooms that are bigger than most candytuft flowers.Candytuft (Iberia)is perfect for rock gardens. Usually white, flowers also blossom in pink hues. Credit Flower_GardenPests/DiseasesMost issues with candytuft plants are related to watering and soil conditions, but pests can occasionally cause stress as well.Common PestsSlugs, snails, and some types of caterpillars may nibble on candytuft leaves and flowers. The best way to manage these pests is to handpick them and drop them into a bucket of soapy water.Moisture-Related ProblemsExcess moisture can cause candytuft to develop root or crown rot, or powdery mildew on its leaves. Growers in humid locations may not want to grow these plants at all, while watering plants at the soil line and growing candytuft in well-draining soil can help you avoid most moisture-related problems.Quick Pest & Problem Tips for CandytuftInspect regularly: Check leaves and flowers for slugs, snails, or caterpillar damage.Handpick pests: Drop any found into soapy water to protect your plants.Water carefully: Avoid overhead watering; keep soil evenly moist but well-draining.Prevent rot and mildew: Plant in full sun or light afternoon shade, and space plants to improve airflow.Humidity caution: In humid regions, consider skipping candytuft or grow in raised beds/rock gardens to reduce moisture stress.Wit and WisdomAccording to the Victorian language of flowers, candytuft symbolizes indifference, so it may not be the best choice for bouquets meant for a sweetheart! See more flower meanings.The name candytuft isn’t a nod to sugary treats. Instead, it comes from “Candia,” the former name of a city on the island of Crete, reflecting the plant’s Mediterranean roots.Candytuft may not look like broccoli, but its family ties are easy to detect: give it a sniff, and you’ll notice a faint cabbage-like scent, a reminder that this ornamental plant belongs to theBrassicafamily.The Candytuft fairy in the gardens of little folk. Credit: Mary Barker Estate

Balloon Flowers
Jane Miller
Balloon flowers may not float, but their whimsical buds puff up like little balloons before bursting into star-shaped blossoms in shades of blue, pink, or white. Native to East Asia and beloved in cottage and rock gardens alike, these low-maintenance perennials bring color and cheer all summer long. Whether planted in borders, containers, or tucked into a stone wall, balloon flowers are as charming as they are easy to grow.About Balloon FlowerA lovely flower with a history of culinary and medicinal use, balloon flower(Platycodon grandiflorus)is primarily grown for its beauty in the United States. Its other common names—which include Chinese balloon flower and Japanese bellflower—reflect its Asian origins. It often grows wild on mountain slopes and open hills in Korea, Japan, China, and Siberia.Balloon flower is a member of the Campanulaceae family and is a hardy perennial throughout much of the United States. It can generally be grown in USDA Zones 3 through 8. It reaches 1 to 2 feet tall, depending on the cultivar, and the taller varieties sometimes require staking. Balloon flower isn’t a go-getter in terms of early growth in the spring—it takes its time to emerge from the ground. Because of this, it blooms in the summer and not in the spring.As far as placement, you really can’t go wrong by situating your balloon flowers in rock gardens, in containers, or using them as edging or border plants. They’ll add gentle pops of blue, pink, white, or purple to corners and edges of your garden, and who doesn’t love that?!Just before they bloom, balloon flower buds look like small hot air balloons. Credit: PastorGPlantingFor best results with balloon flower, you’ll want to start with seeds. Other methods of propagation, like division or stem cuttings, just aren’t as effective with balloon flowers, and most experts recommend starting via seed. Where to Plant Balloon FlowersFull sun is excellent for balloon flower, though a semi-shaded area is OK, too. They’ll bloom more with more sun, though—at least 6 hours is best.You might find that a little afternoon shade is helpful in regions that experience very hot summer days.Balloon flower enjoys some rich soil to help produce those gorgeous blooms—loamy soil with plenty of compost, but still well-draining.Balloon flowers generally need slightly acidic soil with a pH of approximately 6.0 to 7.0.When to PlantDirect sow seeds into garden beds after your last frost date has passed. (Be aware, however, that the plants will be unlikely to flower in the first year if direct-sown outdoors.)You can also start seeds indoors about 6 weeks before your last frost date and then transplant outdoors later, but balloon flowers can be a bit fussy about being moved, so direct sowing is sometimes more effective.How to PlantThe seeds are small, so plant them in the same way you would lettuce or carrot seeds—just lightly pressed into the soil with the thinnest dusting of soil covering them.It’s possible to grow balloon flower from cuttings, but it’s less convenient and success rates are usually lower than growing from seed.Division doesn’t work well for balloon flower, according to the North Carolina State Extension. Balloon flower has a long taproot that is sensitive to disturbance.If you’ve started seeds indoors, you can transplant your balloon flower seedlings outdoors after all danger of frost has passed, or transplant them into a larger container.If growing balloon flowers in a container, it will need to be fairly large and deep to accommodate the plant’s long root.In a garden bed, space your plants 12 inches apart so they have room to grow without obstructing airflow between each other.GrowingBalloon flower is easy to start from seed, and the good news is that it’s even easier to grow!If you do any type of transplanting, do it very carefully and sparingly because these flowers don’t like having their roots disturbed.Take care not to overwater, but balloon flowers do need moist soil.It’s important to know that balloon flower doesn’t establish quickly; if planted from direct-sown seed, you probably won’t get blooms the first year.The upside is that balloon flowers are a long-lived perennial that will give you years of enjoyment.In addition to being slow to initially establish themselves, existing balloon flower plants are slow to start growing each spring, so you’ll need to be mindful of where they’re planted when working in your garden before they emerge. You don’t want to crush one accidentally!As the summer wears on, you can deadhead blossoms as they fade. This will prompt your balloon flowers to put out new blooms as the growing season progresses.As your balloon flowers grow, staking may be necessary to help them support the weight of their own blossoms. This is less of an issue with smaller or dwarf varieties.If desired, you can cut the plants back partway through the growing season. This might reduce the need to stake.Types‘Sentimental Blue’ is a dwarf variety with blue flowers.‘Astra Blue’ and ‘Astra Pink’ are beautiful dwarf varieties.‘Double Blue’ is a lovely cultivar with (surprise!) double blooms. Gorgeous!The ‘Fuji’ series has varieties in pink, white, and blue. These plants are taller and will likely require staking, according to the National Gardening Association.Some varieties of balloon flower feature beautiful double blooms with ten petals. Credit: RococoNekoHarvestingBalloon flowers look simply lovely growing in the garden or on your porch, and they make an excellent (though sometimes underutilized) cut flower. They also attract pollinators. In the United States, balloon flowers typically aren’t harvested for any purpose besides cut flowers.Platycodon grandiflorusis used in traditional Korean cuisine, where the flowers, calleddoraji,are harvested for their roots (also calleddoraji).The roots are said to have a bitter taste and an aroma similar to ginseng.The dried doraji roots are cut into thin strips and often sautéed during traditional Korean holidays. *Note: Some sources say that the roots and older leaves ofP. grandiflorusmay be slightly toxic.Balloon flowers make excellent additions to cut flower arrangements. They look awesome in a vase!You can also easily harvest and save the seeds of open-pollinated varieties after the balloon flower blossoms have dried and faded away. Tiny black seeds reside inside small brown pods, which can be broken open to access the seeds.Pests/DiseasesDeer likely won’t bother your balloon flowers. In fact, the plant is pretty much immune to attacks from most mammals—rabbits, voles, deer—everybody leaves balloon flowers alone. You may see occasional signs of insect pests, such as:SlugsSnailsAphidsSpider mitesAdditionally, a few of the most common plant diseases can affect balloon flowers, though in general they’re pretty resistant:Powdery mildewRoot rotFungal leaf spotWit and WisdomBalloon flower is an herb, and in Chinese medicine, balloon flower has historically been used to treat coughs and colds, but it has also been used to treat hypertension and inflammation, and also used as an antioxidant.Balloon flowers are one of Japan’s traditional “Seven Flowers of Autumn.”


Join us for the 2023 Holiday Bucket List!
Jane Johnson
The Holiday Bucket List is back again this year!Other favorite recipesnextstayCCSettingsOffArabicChineseEnglishFrenchGermanHindiPortugueseSpanishFont ColorwhiteFont Opacity100%Font Size100%Font FamilyArialText ShadownoneBackground ColorblackBackground Opacity50%Window ColorblackWindow Opacity0%WhiteBlackRedGreenBlueYellowMagentaCyan100%75%50%25%200%175%150%125%100%75%50%ArialGeorgiaGaramondCourier NewTahomaTimes New RomanTrebuchet MSVerdanaNoneRaisedDepressedUniformDrop ShadowWhiteBlackRedGreenBlueYellowMagentaCyan100%75%50%25%0%WhiteBlackRedGreenBlueYellowMagentaCyan100%75%50%25%0%We are entering an incredibly tradition-rich, nostalgic, and charming time of year – in my family, most of that is based around the much-anticipated build up to Christmas.It’s everything from familiar holiday music to the warm cozy glow of candles, and the faces of people we love and babies in Christmas jammies (*wipes away a tear*). And maybe best of all, the house is filled with the warm smells of classic recipes that make their appearance just a few times each year.These are the comforting, inviting, and absolutely crowd-pleasing favorites I come back to year after year.I’d love for you to join me!Info For This Holiday Bucket ListDownload the 2023 Holiday Bucket ListWhat is the Holiday Bucket List?How to enter the giveawaysWhat are the recipes and prizes?How to print the Holiday Bucket ListMore FAQsWhat Is The Holiday Bucket List?The Pinch of Yum Holiday Bucket List is a list of 10 of my favorite recipes that I consider must-makes for the holidays!In addition to just being a fun collection of recipes, it’s also a fun little game where we offer the chance to win prizes for any of the recipes.How To Enter The GiveawaysThere are two ways to enter for each recipe giveaway.#1: Share a photo on Instagram and send us a screenshot.For an Instagram entry:Make the recipe.Share your photo or video on Instagram (stories or feed).Email us a screenshot of the share!Send your screenshot tobucketlist@pinchofyum.comand put the name of the recipe in the subject line. That’s it!The idea with this is that you’re making the recipe (the goal of this whole fun little game) so you have to actually share your own photo or video of the recipe. A share of the reel or the Pinch of Yum photo won’t count. We want to see that you made it!♡#2: Leave a comment and rating on the recipe.For a comment entry:Make the recipe.Leave a comment on the recipe with a star rating!That’s it!As much as I’d love to just ask the whole internet to go leave a bunch of 5 star ratings on all these recipes (yes! please! ha!), we ask that you do not leave a rating if you did not make the recipe.If you’re chosen as a winner from the comments, we will ask you to provide a picture of the recipe so that we can verify that you made the recipe!Other Things to KnowYou can enter both ways for each recipe (2 total entries per recipe)!If you’ve already left a comment with a rating on the recipe in the past,you don’t need to leave a second comment. Just take a screenshot of your comment and send it tobucketlist@pinchofyum.comand it will count as your entry for this year! (You’d still need to provide a photo of the recipe if you were selected as the winner.)Entry DeadlinesWe will be accepting entries from December 2nd – December 19th. Submissions will close on December 19th at 11:59 pm CST.Winners will chosen on December 20 and contacted that same day.What Are The Recipes and Prizes?Here is the full list of all 10 Holiday Bucket List recipes, and the prizes for each!1: Vegetarian Shepherd’s Pie2: Date Night RigatoniNote: Brightland prize not eligible for Canadian residents.3: Soft Gingerbread Cookies with Maple Glaze4: Rosemary Pom Spritzer (The Merry Mocktail)5: Swedish Pancakes6: Thai Yellow Chicken Curry with Potatoes7: The Best Swedish MeatballsNote: Nuuly prize not eligible for Canadian residents.8: The Very Best Chocolate Cookies9: Chicken Pot Pie with Biscuits10: No Knead BreadHow To Print The Holiday Bucket ListYou can find the printable Holiday Bucket List here!Other Important DetailsWhat if I want to make dietary modifications to a recipe?No problem! Make your subs and swaps. Send us the photo like usual, and if you leave a review it’s super helpful if you note what you changed about the recipe (used tofu instead of chicken, for example) in case others might want to do the same.Can I share my recipe photo multiple times for more entries?No, just one share / screenshot email per person will be counted.How old do I have to be to participate?To be entered to win a prize, you will need to be 18 years or older.Do I need to live in the U.S. to win?Due to shipping restrictions for the prizes, you must reside in the U.S. or Canada (see note below).Note for Canadian residents: the Brightland Olive Oil and Nuuly prizes are not eligible for shipping to Canada.How will winners be chosen?For each recipe, we combine both the screenshot/email entries and the comment/rating entries into one pool. From there, we pick a random number and find the winning entry.Can I win multiple prizes?You can enter them all! One prize per winner is allowed.If your name is selected for a prize, a member of our team will contact you through the email address used for your entry.Where do I find the Holiday Bucket List recipes?All of the recipes are linked in this section of this post!I’m so excited for this season and so excited to get some of these tried-and-true recipes rolling in my kitchen (and in yours)!I will be making these recipes on Instagram throughout the next 3 weeks as we run this Holiday Bucket List challenge, so be sure to check stories, reels, and highlights on Instagram to see the recipes up close and personal in my kitchen! You can follow along here.And as you’re making the recipes, if you have questions, drop a comment on the recipe post or email our team at hello@pinchofyum.com! We’d love to help.Happy holiday season to you and yours! We’ll be back after December 20th to announce winners!Looking For More Holiday Recipe Ideas?Check out our full collection of holiday recipes!
Plumbago
Emily Miller
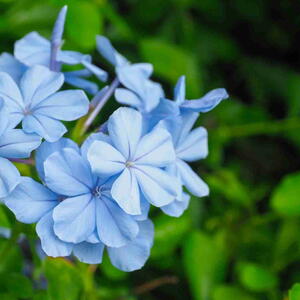
What plants have unrivaled pale blue blossoms that host a unique blue butterfly? We’re talking about plumbago, also called cape leadwort. Prized for its profuse phlox-like flowers, this butterfly magnet can be grown as a shrub, vine, or potted plant. Learn more about planting and growing plumbago plants.Here at theAlmanac, we adore true blue blossoms, the rarest of all the flower colors. And it’s even more exciting when you find such ethereal blue flowers on a gorgeous shrub that will bring beauty to your garden.About PlumbagoThere are many members of the Plumbaginaceae family and several types of plumbago, butPlumbago auriculatais generally the one most commonly grown in the United States. It’s also called cape leadwort, cape plumbago, and blue plumbago. Note: Do not confuse this plant with hardy blue plumbago, (Ceratostigma plumbaginoides), a low-growing ground cover with darker blue flowers. Plumbago auriculatais an herbaceous shrub. It has a mounding habit with gracefully arching, semi-woody stems with evergreen leaves. The blue flowers grow in clusters (terminal racemes) of five-petaled blue flowers similar to phlox. They bloom from spring through fall and are beloved by bees and pollinators; specifically, plumbago hosts the larvae of the Cassius blue butterfly (Leptotes cassius). After flowering, the plant produces barbed fruit capsules. It spreads via rhizomes (underground stems) but isn’t considered invasive. Best of all, plumbago is easy to grow and drought-tolerant and requires little watering. It has few pests or diseases. Deer will not usually eat it. However, it’s toxic to humans and animals; while animals know enough not to chew on the shrub, humans should wear gloves when pruning to protect their skin from any irritation.Where to Grow PlumbagoWhere and how you grow this shrubby plant depends on your hardiness zone. In warm USDA Zones 8 through 11, grow outdoors as a perennial shrub, reaching 5 to 7 feet tall. Plumbago is a favorite of gardeners in southern parts of Texas and Florida. It’s native to tropical climates in South Africa and is quite heat-tolerant. You can also train plumbago like a vine to climb up a trellis.Any way you look at it (even from above!), plumbago is a show-stopper in the garden. Credit: Silapavet KonthikameeIn other climates, grow as an annual plant in your yard. Or, in any zone, plant plumbago in a pot or container; it will typically grow 1 to 3 feet per year and be kept compact through periodic pruning. If you wish to keep it year-round, transfer the pot indoors when the weather gets chilly.Blue plumbago is lovely planted in a pot all by itself, but also mixes well with other flowers and herbs. Credit: Chris CurtisPlumbago makes an excellent foundation plant, low hedge, border, or along a patio or fence. Or, plant en masse and watch the butterflies gather! When trellised or grown along a wall, it creates a beautiful waterfall effect. In a container, plumbago looks stunning on the patio or deck outdoors.PlantingPlumbago is an easy-going plant that isn’t particularly fussy about its conditions but will thrive when provided with the ideal situation. Plant in full sun to partial shade in fertile, well-draining soil. It prefers a soil pH that is slightly acidic to neutral.When to PlantIf buying as a container plant, transplant in early spring to enjoy the spring and summer warmth. As a perennial in Florida or Zones 8 to 11, you can plant them at any time of the year.If planting by seed in the spring, it’s also best to plant in the early spring. Note that plants grown from seed generally will not flower until the second year.Propagating by division is best done in the fall.Stem cuttings are a good project for spring.Profuse blooms of plumbago pouring over a planter. Credit: suchai.guaiHow to PlantIn the garden, space the transplants 3 to 5 feet apart. They need plenty of room to sprawl, so don’t crowd.When planting from seed, choose large containers and plant one seed in each container; plant approximately ¼-inch deep and cover with soil. Germination may take time (possibly over 2 weeks), so be patient!Stem cuttings and root cuttings are somewhat more complicated forms of propagation but can be quite successful. Purdue University outlines the steps for both methods here.Division is another easy way to propagate plumbago.GrowingPlumbago doesn’t need a lot of maintenance.Water regularly while establishing young plants, but mature plants are drought-tolerant and require minimal watering.Plumbago will grow more slowly in a container, plus it will require periodic trimming to keep it to a compact size.Deadhead faded or spent blooms regularly throughout the growing season.Plumbago will be happy to climb a trellis (with a bit of help from you). Tie its arching plants and cut back if the plant gets too leggy. Plumbago just keeps going in hot weather; trim periodicially to keep up a pleasing appearance. Credit: Be SaowaluckPruning PlumbagoAim to prune in late winter or early spring for a more pleasing appearance. Do not prune in summer because flowers form on new growth. However, you can prune off dead or diseased branches any time during the year. Also, get rid of any errant suckers that grow near the plant’s base.If your plumbago is old or out of control, prune back to one-third of its size. Don’t worry; this plant grows quickly and will recover.Propagating PlumbagoIt’s easy to create new plumbago plants from the mother plant! During the growing season, choose healthy, flexible stems. Cut off 4 to 6 inches in length with a clean, sterile clipper, cutting just below a set of leaves. Dip the lower third of the stem in rooting hormone and put it in a small pot with potting soil. Water and cover in plastic. New shoots should appear in a few weeks. Pot up in a larger container.If you’re planting outside, then harden off and plant out in the spring. If you’re keeping it in a container, repot every few years in a larger pot with fresh potting mix.Overwintering PlumbagoIf you plan to overwinter in a container, you can treat it as a houseplant or dormant plant.As a houseplant, bring indoors before the first fall frost. Set in a bright, sunny room. Water sparingly.As a dormant plant, cut it back (as you would as a perennial) and store in a cool, dark basement or garage.Types‘Monott’ is a smaller (up to 3 feet tall) variety with blue flowers.While plumbago is widely known for producing blue flowers, a white variety called ‘Alba’ is also available.While mostly notably known for its iconic blue flowers, plumbago can also be found in white, as in the ‘Alba’ cultivar shown here. Credit: PFMphotostockPests/DiseasesPlumbago is known for being relatively unbothered by pests and diseases, but chili thrips, cottony cushion scale, whiteflies, spider mites, and mealy bugs can sometimes be present, especially on plumbago plants grown indoors as houseplants.Wit and WisdomPlumbago isn’t a carnivorous plant, but it does have hairy flowers that insects can become trapped in. As such, it’s sometimes classified as a “murderous plant.”The plant’s name goes back to ancient Rome and the famed early naturalist Pliny the Elder. It was once used as a cure for lead poisoning, and the nameplumbagorefers to “lead.” This is also where the alternate common name ofleadwortcomes from. The species’ name refers to its ear-like leaf base.As early as the 1780s, plumbago was transplanted to the East Indies, used in gardens.Plumbago was used in Africa to make dye and was medicinal for wounds, warts, and other issues. (However, please remember that plumbago is known to be toxic.)Plumbago symbolizes “hope,” which fits well with its heavenly, sky-blue hues.

Cordyline
Michael Davis
Want to turn your home or garden into a mini tropical paradise? Meet cordyline: the plant with leaves sharp enough to catch attention and colors bold enough to make your neighbors jealous. Whether you’re aiming for a lush indoor statement or a sunny patio showstopper, cordyline delivers exotic flair with surprisingly low fuss. Let’s dive into what makes this tropical stunner a must-have for plant lovers.About CordylineCordylines are members of the Asparagaceae family and cousins to agave. It’s a broadleaf perennial that is winter hardy in Zones 9 to 11, so it’s treated as a houseplant or a container plant that’s winterized in most areas. The large leathery leaves add drama and an architectural feel, whether you dream of a towering outdoor specimen or a compact houseplant.Among the 15 species and many more varieties, cordylines have distinctive leaf shapes, sizes, and colors: foliage shades range from pink, red, purple, and green to orange and white, often in combinations. Many cordylines produce flowers followed by berries; container plants outdoors seldom bloom, but houseplants may.Cordyline fruticosa.Credit: Witsawat. S, ShutterstockThe most common species among home gardeners isCordyline fruticosa, which in temperate zones typically winters indoors as a houseplant and summers on a porch, patio, or poolside. This plant also boasts a rich history, from the mythical allure of the Ti plant, which is believed to ward off evil spirits, to the practical use of its leaves as a cabbage substitute. PlantingWhere to PlantOutdoors:If you want to keep this species outdoors year-round, you’ll need to live in a tropical or subtropical climate with warm, frost-free areas. Choose a sheltered spot in your garden. Their long sword-like leaves can tear if they’re exposed to strong winds. Most varieties need bright, full sun, which enhances their vivid colors; however, if you live in a particularly hot area, they would benefit from partial shade to prevent leaf scorch. To plant, dig a hole twice as wide and slightly deeper than the root ball, and then add compost and fertilizer to the soil. Place the rootball in the hole, making sure the top is level with the ground, and fill the hole. Keep the plant moist until it’s fully established, but don’t overwater.Containers:Cordyline grows brilliantly in containers, and this is a great option for those areas where the plant will need to be brought indoors over winter. Keep the plant outdoors in containers during warmer months when any threat of frost has passed. Cordyline in a container requires a generous base (it develops a taproot), so choose a tall pot with a width of at least 6 inches greater than that of the root ball; go larger if other plants will be grown with the cordyline.Houseplants:As a houseplant, cordyline needs a moderate level of care.Light: Set in bright light, but avoid direct sunlight.Moisture: The potting mix needs to stay moist. Reduce watering in winter; just water when the surface is dry.Temperature: Temperatures must be above 62°FHumidity: These plants prefer a high-humidity environment and may experience leaf drop without humidity.All potted plants need rich, well-draining potting mix with a neutral pH (between 6.0 and 7.0); the exact growing medium will depend on the variety. For example,C. fruticosaneeds a rich, well-draining, peaty potting mix (a blend of fine and coarse material with 30% to 50% organic matter) with a pH of 6.0 to 6.5.C. australisis less particular, but a potting mix amended with compost is preferable. Propagating CordylineCordyline can be grown by taking cuttings or from seed. Growing these plants from seed requires patience and lots of attention, and it will take years for a seed to develop into a sizable plant, but it can be a rewarding endeavor. The most popular method for planting cordyline plants is to take a cutting from a mature plant. Cordyline can be propagated from cuttings (aka “Ti logs”) by using the following steps:Cut a 3- to 5-inch piece from a leafy head and remove all foliage. (Cut the top of the stem at a slight angle to indicate which end should be up.)Dip the bottom end in rooting hormone.Prepare a mix of sand and peat moss or perlite and dampen it.Insert the stem into the mix.Alternatively, a cutting can also be placed in water to a depth of about one-third of its length. Place the cutting in a room with a temperature of at least 60°F where it will receive bright indirect light and maintain its dampness. Shoots will appear in 4 to 8 weeks (or longer, depending on conditions)—plant when the cuttings have four to six leaves.GrowingCordyline Plant (Young Cabbage Tree). Credit: Burning Bright, ShutterstockHow to Care for Cordyline OutdoorsLight:For the best color, place multicolor cordylines in dappled light; protect them from direct sun, which can burn their leaves. Green-leafed plants do best in direct sun.Water:Water regularly; cordylines like consistently moist soil but not “wet feet” (standing water) from spring to fall.C. fruticosagrown as a houseplant requires watering when the surface of the growing medium feels dry; provide enough water to cause it to flow out of the container.Fertilize:Fertilize in spring, if desired, with a granular, slow-release formula or apply a balanced liquid formula at half-strength weekly. Avoid fertilizing in winter.PruningA healthy plant should have stems of varying heights and, depending on the variety, usually grow up to 3 to 4 feet. If the stem becomes leggy and/or the foliage is unattractive, in late winter, remove the foliage top, leaving 1 foot of bare stem. New growth will emerge.OverwinteringOverwinter cordyline in a bright, sunny spot in a home or greenhouse at 60°F or higher. Reduce watering and provide humidity indoors. Consider placing the plant in a bathroom, setting it on a pebble tray, and/or misting the foliage.Yellow foliage could indicate overwatering, too much sunlight, and/or drafts. To address, reduce watering and/or move the plant out of direct sunlight and away from drafts.TypesStunningC. fruticosa.Credit: Chris F, PexelsCordyline banksii‘Sprilecpink’, aka Electric Pink:hardy in Zones 9 to 11; 4 to 8 feet tall; dark maroon spikes with brilliant pink edgesC. fruticosa‘Exotica’:hardy in Zones 10 to 12; 3 to 5 feet tall; variegated green, cream, and pink-green leavesC. fruticosa‘Red Sister’:hardy in Zones 9 to 12; up to 6 feet tall; foliage emerges bright pink before gradually darkening to cherry red with burgundy variegationC. fruticosa‘Singapore Twist’:hardy in Zones 9 to 11; up to 8 feet tall; green leaves with burgundy undersides and bright pink stems in fan formC. australis‘New Zealand Cabbage Tree:hardy in Zones 9 to 11; grows from 6 to 30 feet tall; broadleaf ever-green leaves in a variety of colors.Pests/DiseasesCordyline are pretty resistant to most pests and diseases, but can sometimes suffer from root rot and mealybugs. Root rotoccurs when you overwater these plants. They like to be kept moist, but not soggy! Watch out for drooping or yellow leaves—this will be your first sign that you’re overwatering. Mealybugsare pests that cause yellow and distorted leaves. You’ll find them under leaves and near stems. Telltale signs include finding sooty mold which they secrete after sucking the sap from the plant. To remove, isolate the plant and treat it with soapy water, neem oil, or insecticidal soap. Other diseases and pests to watch out for include:Diseases:bacterial leaf spot, fungal leaf spot, Fusarium root rot. Pests:fungus gnats, scale insects, spider mites, thrips.Other Common ProblemsBrown-tip foliage indoors could indicate underwatering. Try watering your plant and placing it somewhere with more humidity.Yellow leaves may be a sign your plant is receiving too little water. You don’t want the growing medium to be soggy, but you want to keep it moist. Make sure to water your plant when the top of the medium is dry. Sometimes, cordyline can grow much bigger than you want them to. This problem is easily solved; simply cut down to the height you want them to be. C. australis‘Red Star’. Credit: Emilio Sánchez HernándezSummaryCordyline is a versatile and vibrant plant that thrives in the right conditions. Ensure they have the correct amendments, light and water requirements, and protection from frost and strong winds, and you’ll be rewarded with striking foliage for your outdoor or indoor space. Wit and WisdomThe name “cordyline” comes from the Greekkordyle, meaning “club,” which describes the appearance of the plant’s root system. This led to another common name, the club palm.Do not confuse cordyline with dracaena. The plants may look alike, but they differ at the root: Cordyline roots are white, while dracaena roots are orange.According to the University of Hawaii, Kapi‘olani Community College, “There is a legend that states that if there is a suspicion of a shark or supernatural creature in the water, you can place a Ti leaf in it to determine if it is safe. If the Ti leaf sinks, it is dangerous, and if it floats, it is safe to enter.”Legend has it thatCordyline australiswas given one of its common names, cabbage tree, by British naval explorer James Cook while visiting New Zealand (the plant’s native habitat) because he found its edible foliage to be a suitable substitute for that vegetable.Its cousin,C. fruticosa(formerlyC. terminalis), aka “the good luck plant” or Ti plant, charmed early Polynesians into thinking that it had magical powers and that its presence could protect members of a household from evil spirits.

Mom's Chocolate Pie
Robert Jones
This recipe for Mom’s Chocolate Pie comes from a loyal reader’s mother. It’s about 100 years old and has stood the test of time in their family. It’s one you’ll want to make again and again (and again).FillingIngredients1-1/2 cups sugar1 tablespoon cocoa1/4 cup flour1/2 teaspoon salt1 cup cream1/2 cup whole milk4 eggs, separated1 tablespoon butter1 teaspoon pure vanilla1 baked pie crust; should be of the deep-dish varietyInstructionsIn a bowl, combine sugar, flour, cocoa, and salt and set aside. Separate eggs, reserving whites in a clean, chilled bowl for topping. In a saucepan, combine cream, milk, and cocoa mixture and cook over medium-low heat, stirring constantly, until slightly thickened. Beat egg yolks until thick. Add small amount of chocolate mixture to egg yolks and stir. Then, add the egg yolk mixture to the chocolate mixture and cook over medium-low heat until it is very thick. Remove from heat and add butter and vanilla. Stir, and set aside to cool.ToppingIngredients1 teaspoon cream of tartar4 egg whites (reserved from the Filling)1 cup sugarInstructionsPreheat oven to 350°F. In a chilled mixing bowl, beat egg whites and cream of tartar until foamy. Slowly beat in sugar until stiff (but not dry) peaks form. Pour cooled filling into the pie crust, and top with meringue. Bake for 12 to 15 minutes, or until meringue is just lightly browned.
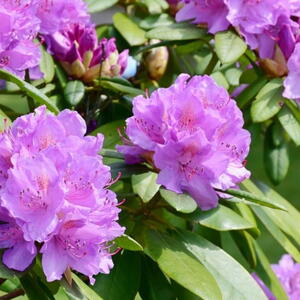
Rhododendrons and Azaleas
Robert Johnson

Tourtière (A Christmas Meat Pie)
Sarah Johnson

False Indigo
David Williams
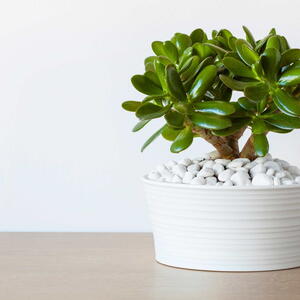
Jade Plants
Robert Smith

Potato Bread
Jane Brown

Apple Pie with Cider Pecan Crust
Emily Davis

10 Tips Cookie Bakers Need to Know
Robert Williams

Persimmon Bread
Robert Johnson
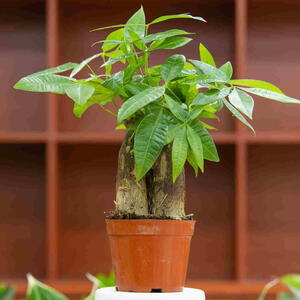
Money Tree
Robert Brown

Maples
Robert Brown

Poor Man’s Cake
Emily Williams
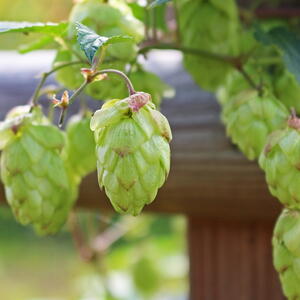
Hops
Jane Smith
Latest Articles

The State Of Things: A Coffee Date for 2024
David Smith
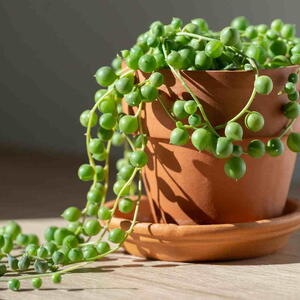
String of Pearls
Sarah Smith

Baked Honey Balls (Italian Struffoli)
Robert Davis

Recipes for Leftover Bread
John Brown

Mint Brownies (or Grasshopper Brownies)
Emily Brown

Nana's Funny Cake Recipe
David Johnson
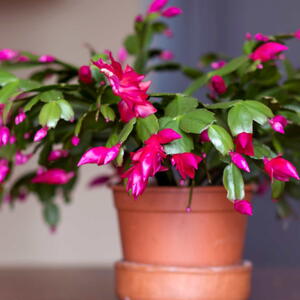
Christmas Cactus
John Smith

Morning Glory Muffins
Robert Johnson

Double-Apple Walnut Bread Recipe
Michael Williams

Thanksgiving Turkey Cookies
Robert Davis